
To create a DIY steampunk birdcage lamp, start by choosing a sturdy cage that’s easy to modify and clean. Add metal accents like gears or pipes to give it an industrial look, then securely attach vintage Edison bulbs with visible filaments for warm, nostalgic lighting. Inside or outside, incorporate decorative elements such as gears or antique keys for added charm. Carefully wire everything for safety, and if you keep going, you’ll discover tips to perfect your steampunk masterpiece.

Get art and craft supplies delivered free with Prime
- Fast, free delivery on millions of items
- Prime Video, Amazon Music and more included
- Member-only deals all year
Key Takeaways
- Choose a sturdy birdcage and clean it thoroughly before modifications.
- Attach metal gears, pipes, and vintage accents to enhance the steampunk aesthetic.
- Install Edison-style filament bulbs with warm amber hue, threading wiring neatly through the cage.
- Incorporate decorative elements like clock gears or antique keys, securing them with glue or screws.
- Ensure safe electrical connections, conceal wiring stylishly, and test the lamp’s illumination and appearance.

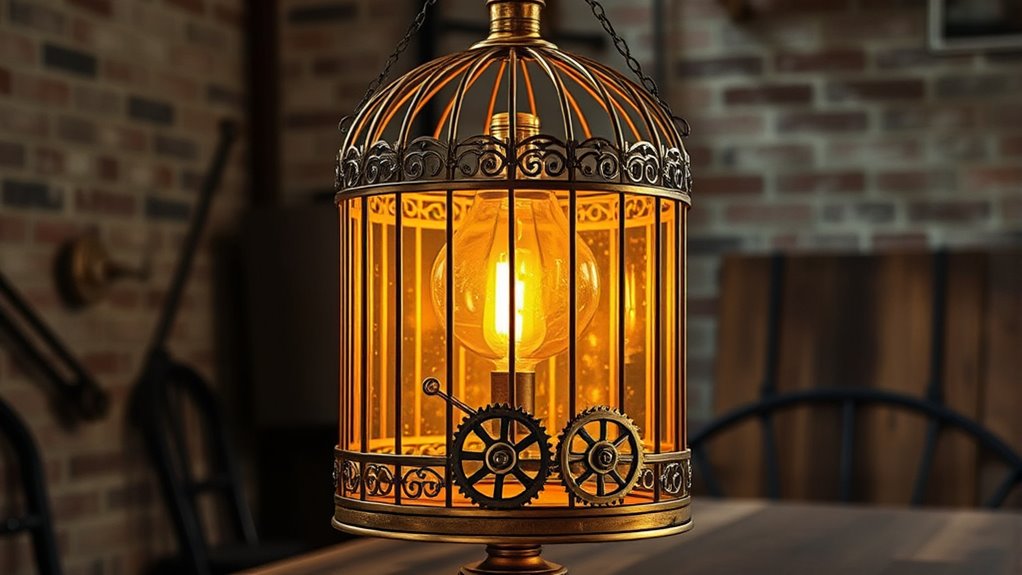
Ever wondered how to transform an ordinary birdcage into a mesmerizing steampunk lamp? The secret lies in adding the right touches—metal accents, vintage bulbs, and a dash of creative flair. To start, choose a birdcage that has a sturdy structure and enough space inside for wiring and a light source. Once you have your cage, you’ll want to incorporate metal accents to give it that authentic steampunk vibe. Think about attaching gears, pipes, or decorative metal strips along the bars, or even affixing some small metal brackets to add visual interest. These accents not only enhance the industrial look but also make your lamp a true conversation piece.
Next, focus on installing the lighting. Vintage bulbs are essential for capturing that warm, nostalgic glow typical of steampunk decor. Look for Edison-style bulbs with visible filaments; their amber hue adds to the ambiance and complements the metal accents perfectly. When wiring your lamp, make sure to thread the cord through the cage carefully, keeping it neat and secure. You might also consider adding a dimmer switch, so you can adjust the lighting intensity and create the perfect atmosphere.
Vintage Edison bulbs with visible filaments add warm, nostalgic glow and complement steampunk accents.
To further customize your lamp, you can add small decorative elements like clock gears, miniature gauges, or antique keys inside or outside the cage. These details contribute to the layered, eclectic look characteristic of steampunk design. When attaching these items, ensure they’re securely fastened with small screws or hot glue—just enough to stay put without damaging the cage. Be sure to position the vintage bulb in a way that highlights these accents, casting interesting shadows and enhancing the overall aesthetic.
Additionally, understanding lighting techniques can help you achieve the desired mood and visual effect for your lamp. Finally, give your DIY steampunk birdcage lamp a finishing touch by sealing any exposed wiring with decorative elements like leather straps or vintage-style cord covers. This not only improves safety but also elevates the visual appeal. Once everything is in place, plug it in, switch it on, and marvel at how an ordinary birdcage has been reinvented into a captivating piece of functional art. With the right combination of metal accents, vintage bulbs, and thoughtful details, your lamp will illuminate your space with a unique, steampunk charm that’s both stylish and personalized.
As an affiliate, we earn on qualifying purchases.
Frequently Asked Questions
Can I Use LED Bulbs in the Steampunk Birdcage Lamp?
Yes, you can use LED bulbs in your steampunk birdcage lamp. Just check the LED compatibility with your lamp’s socket to guarantee it fits properly. LED bulbs are energy-efficient and offer plenty of bulb brightness, making your lamp shine brightly without consuming much power. They’re a great choice for creating the perfect steampunk ambiance while keeping your energy bills low.
What Tools Are Essential for Assembling the Lamp?
Imagine you’re in a Victorian workshop, but with a modern twist—you’ll need a wire stripper to carefully remove insulation from your wires and a soldering iron to join electrical connections securely. These tools are essential for assembling your steampunk birdcage lamp. You’ll also want pliers, screwdrivers, and possibly a drill to secure parts. With these, you can confidently bring your vintage-inspired creation to life, ensuring safety and durability.
How Do I Prevent Rust on Metal Parts?
To prevent rust on metal parts, you should apply a metal treatment like a rust inhibitor or primer before assembly. Afterward, use protective coatings such as clear sealants, paint, or varnish to shield the metal from moisture and air. Regularly inspect your lamp, and reapply coatings as needed. Keeping the metal dry and clean also considerably reduces rust risk, ensuring your steampunk birdcage lamp stays pristine longer.
Is There a Safe Way to Wire the Lamp?
Did you know that electrical safety is vital, with over 1,000 electrical fires reported annually? To wire your lamp safely, always turn off the power before working on wiring components. Use insulated tools and match wire colors properly. Follow local electrical codes, and consider consulting a professional if you’re unsure. Proper wiring guarantees your steampunk birdcage lamp is both beautiful and safe to enjoy.
Can I Customize the Size of the Birdcage?
Yes, you can customize the size of the birdcage by adjusting the birdcage dimensions. To do this, measure the desired size carefully, then modify the cage’s components accordingly. You might need to cut or add materials like metal or wire to achieve your ideal size. Keep in mind that precise size adjustment guarantees your lamp remains sturdy and functional while fitting your space perfectly.
As an affiliate, we earn on qualifying purchases.
Conclusion
Now that you’ve crafted your own steampunk birdcage lamp, you’ve truly brought a piece of vintage charm to life. Remember, sometimes it’s the little projects that light up your world in unexpected ways. Keep experimenting and let your creativity take flight—this is just the beginning. When you put your heart into it, every detail shines brighter than you’d ever imagine. So, don’t be afraid to let your imagination run wild and see where it takes you.
vintage industrial lighting parts
As an affiliate, we earn on qualifying purchases.
As an affiliate, we earn on qualifying purchases.
As an affiliate, we earn on qualifying purchases.
Fall Picks
fall essentials
As an affiliate, we earn on qualifying purchases.