
To achieve authentic steampunk props, master advanced weathering by layering oxidation effects with paint chipping techniques. Use specialized patinas and reactive paints to simulate corrosion on metals, focusing on edges and crevices for realism. Combine this with deliberate paint distressing using sponges or brushes to reveal worn layers. Carefully blending these methods creates a convincing aged appearance with depth and texture. Keep exploring these strategies to open more ways to enhance your creations.
Key Takeaways
- Utilize layered oxidation techniques with specialized patinas to replicate natural corrosion on metal surfaces.
- Combine paint chipping with crackle mediums and masking to create realistic wear and surface distress.
- Focus application on edges, crevices, and high-contact areas for authentic aging effects.
- Integrate both visual and tactile weathering methods to enhance realism and prop durability.
- Incorporate cultural-inspired color palettes and textures to achieve authentic steampunk aesthetics.

Weathering techniques have evolved beyond basic methods, allowing artists and designers to create more realistic and textured finishes. When crafting authentic steampunk props, mastering advanced weathering methods can make a significant difference in achieving a convincing aged look. Two key techniques to contemplate are oxidation effects and paint chipping, both of which add depth and authenticity to your creations.
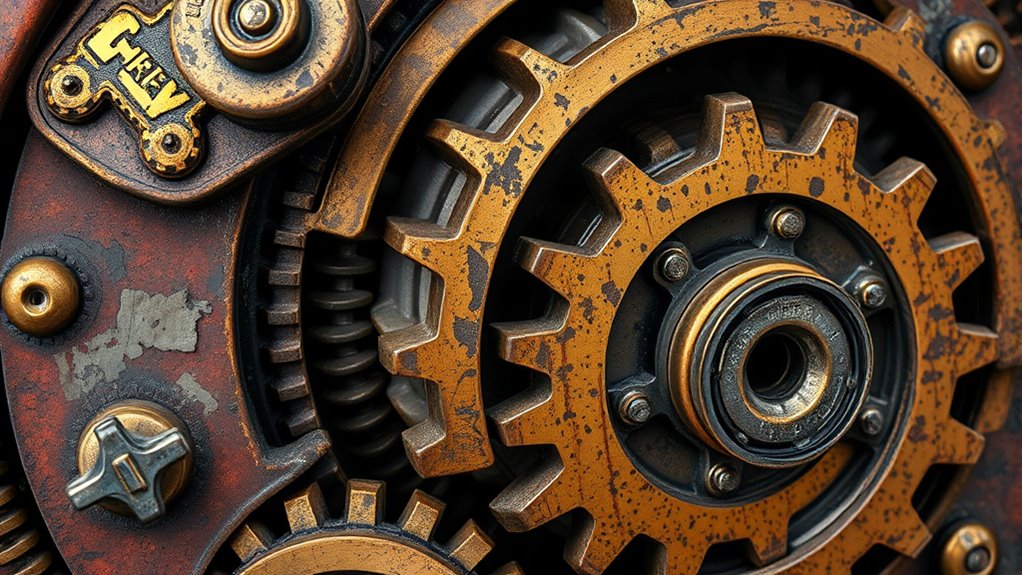
Oxidation effects are essential for replicating the natural corrosion that occurs over time on metal surfaces. To create these effects, you’ll want to start with a base coat that mimics the metal you’re replicating, whether brass, copper, or iron. Using specialized patinas or reactive paints, you can simulate the oxidation process, which often results in greenish, bluish, or even reddish hues. Applying a controlled layer of these products allows you to develop a realistic patina, enhancing the aged appearance. The key is to build up the oxidation gradually, paying attention to areas that would logically experience more exposure to moisture and air, such as edges, crevices, or surfaces prone to wear. This layered approach not only brings visual complexity but also adds a tactile dimension, making your props feel more tangible and genuine. Incorporating cultural impact can also influence the choice of colors and textures used in your weathering process to better reflect historical accuracy.
Paint chipping is another powerful technique that can dramatically alter the look of your props, giving them a worn and used feel. Instead of simply applying paint evenly, you intentionally create areas where the paint appears to have flaked away, revealing the underlying material. To achieve this, you might start with a base coat of the primary color, then use tools like sponges, stiff brushes, or even fine sandpaper to gently distress the surface. For a more controlled chipping effect, apply a layer of crackle medium or use latex masking fluid before painting. Once the paint is dry, carefully remove or chip away the top layer in areas where natural wear would occur—edges, corners, or high-contact spots. Combining paint chipping with oxidation effects can really bring your steampunk props to life, making them look as if they’ve endured decades of use and exposure.

Metal Earth Steampunk Dragonfly 3D Metal Model Kit Fascinations
HOBBY MODEL KIT – Unassembled model packed in an envelope with easy to follow instructions. Ideal for ages...
As an affiliate, we earn on qualifying purchases.
Frequently Asked Questions
What Materials Are Best for Authentic Steampunk Weathering?
For authentic steampunk weathering, you should use materials that mimic aged metal and worn surfaces. Metal patinas are perfect for creating realistic corrosion and color variations, while paint chipping adds a distressed, vintage look. You can achieve this by using acrylic paints, varnishes, and chemical solutions for patinas. Combining these techniques helps you craft props that look genuinely old, weathered, and true to the steampunk aesthetic.
How Long Does Each Weathering Technique Typically Take?
You can expect aging effects from each corrosion method to take anywhere from a few hours to several days, depending on your materials and desired look. Techniques like rusting or patina application often take several hours to develop natural, authentic effects. If you’re aiming for deep corrosion, it might take a day or more. You’ll want to monitor your project closely, adjusting timing to achieve the perfect weathered, steampunk aesthetic.
Can These Techniques Be Used on Existing Props?
Did you know that nearly 70% of prop makers repurpose existing items? You can definitely use these techniques on existing props. For ageing metal, apply rust effects or patinas to create a worn look. For distressing wood, use sanding or staining methods. These techniques breathe new life into old pieces, making them look authentically vintage. With patience, you’ll enhance your props’ realism, no matter their current condition.
What Safety Precautions Are Necessary During Weathering?
When weathering your props, you need to prioritize safety. Always wear protective gear like gloves, masks, and goggles to avoid inhaling dust or fumes. guarantee proper ventilation safety by working in a well-ventilated area or using exhaust fans to prevent buildup of harmful fumes. Take breaks to avoid fatigue, and carefully read all product instructions. Staying cautious helps you achieve authentic finishes while keeping yourself safe.
How Do You Prevent Over-Weathering or Damage?
Think of your prop as a delicate antique, where over-weathering can wear away its soul. To prevent this, you must master the art of patina preservation, carefully controlling your weathering layers. Use light touches and test patches to gauge weathering longevity, ensuring you don’t strip away detail or cause damage. Regularly step back and assess your work, so your steampunk masterpiece retains its character without losing integrity.

World Cup Soccer Jersey Bunting 42 Jersey-Shaped Pennant Banner, Game Day Decorations, Soccer Fan Garland for World Cup Party, Soccer Birthday, Tailgate, BBQ, Man Cave, Outdoor Sports Events
42-Piece Soccer Jersey Pennant Set:This set includes 42 miniature soccer jersey-shaped pennants, each featuring classic team jersey designs...
As an affiliate, we earn on qualifying purchases.
Conclusion
Don’t worry if it feels tricky at first; weathering takes practice, and even pros started somewhere. With patience and these techniques, you’ll create steampunk props that look truly authentic and aged. Remember, imperfections add character, so embrace the process and enjoy your creative journey. Before you know it, your props will have that perfect blend of history and artistry, making your steampunk world come alive. Keep experimenting—your craftsmanship will only improve with time!

10PCS Soccer Balloons,Foil Soccer Balloon Set Party Decorations for Summer Soccer Games,Birthday Party Supplies,Soccer Fans& Lover Party Decor
Kick off your next event with a burst of excitement with our vibrant Soccer Patterned Balloons! Perfect for...
As an affiliate, we earn on qualifying purchases.

3PCS Soccer Party Decorations - Large Soccer & Trophy Foil Balloon Set, Sports/Birthday Themed Party Supplies for Soccer Fans,2026 World Cup Decor
Oversized Impressive Sizes - Set includes 2 giant soccer foil balloons (22inch X 38.5inch) and 1 extra-large trophy...
As an affiliate, we earn on qualifying purchases.